Deer Park United Church
With this series of drawings, I have been able to resume my intended project. I started by going to the Toronto Archives to take pictures of the original plans. Deer Park United, or Deer Park Presbyterian, is located on St. Clair Avenue West at Foxbar Road. It is currently being converted into a condominium, but I wanted to draw it as it was originally designed.
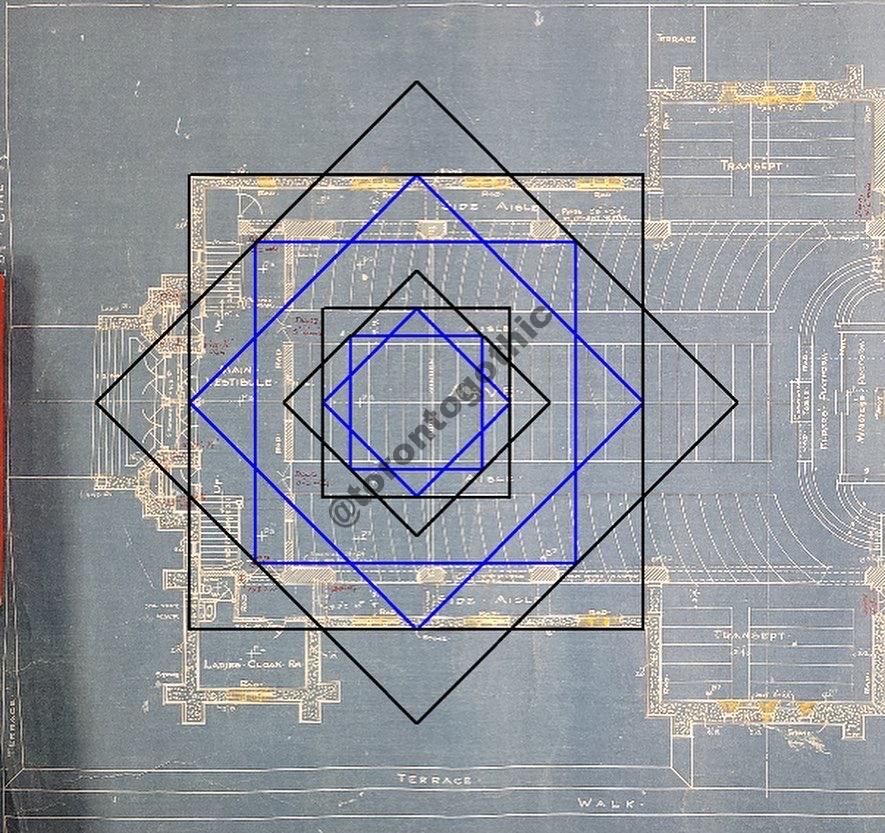
To start, I wanted to see if the building design fitted a geometric scheme typical of Gothic Revival buildings, based on the medieval Gothic constructions and proportioning methods. It turns out that this church appears to be a perfect match to the ‘ad quadratum’ proportioning method, using squares and turned squares (i.e., diamond), which form octagons and octagrams. The following picture shows a set of squares and turned squares that appear to point at many of the features of the layout. The smallest black square is set to the width of the nave and aisles, as was the custom for starting the proportioning exercise. The larger square is created by extending each of the sides of the octagon formed within the small octagram until they intersect. It can be seen that the large square provides the dimension for the main body of the church, while the large turned square provides the width of the transept:

It was common in proportioning to insert another set of squares and turned squares within these, sized by setting the teeth against the midpoint of the octagon sides as shown below:
This provides some additional points of interest, though we really see it take shape when it is a) duplicated and put directly adjacent, and b) when the same series of squares of the same precise dimensions is flipped up to be vertical and superimposed on the front facade. Here is what these look like:

Beginning with (a), it can be seen above that the rectangle formed by placing these side-by-side (an arrangement George Lesser called the dodecaid – see the Reference Materials section) provides the breadth of the church without the octagonal hall, and the top and bottom teeth of the octagram point at the back of the transept (the shared boundary of the large squares mark the front). The series of squares and turned squares on the right telescopes in directly to the Minister’s platform, with the sides of the octagon enclosing the Elder’s platform and communion table. And most notably, the “east” tooth of the larger blue octagon (it’s actually north in-situ but I’ll treat up as north for this) points at what is the centre of the octagonal hall that completes the structure. As is common to the ‘ad quadratum’ method, another of the large black squares is set to the right but at a half length, resulting in the following when the corresponding turned square is added:

It can be seen that the octagon that is formed therein is the exact shape of the octagonal hall.
As mentioned above, if the left-most series of squares and turned squares are imagined to be flipped up using the west side of the large black square as the hinge so that they are vertical (imagine as if that set is the page of a book, and you are turning it but stopping halfway), you get the following:

These provide basically every dimension of the front face of the building, with the large turned blue square (diamond) giving the peak and pitch of the roof, and, following that diagonal down to the left, the west tooth points to the eave of the transept. The small blue square perfectly encloses the base of the front window, while the north tooth of that octagram provides the height of the peak of that window. There are many other points provided by this simple set of squares.
Façade Drawing
The first image I drew of this building was the front façade, starting with the nested squares shown above.

The next step was to use the above as a framework for drawing the building, as shown below.

Once the building outline was fully drawn, I started adding details.


As can be seen above, it was important to add shadows to give the building a sense of depth. The image below gives a glimpse of that process.

Below is the final image. You can see that, like the other facades I’ve done, I have kept the parts of the geometric scheme that fall outside of the building outline.

Perspective View
My next objective was to draw the building from an interesting perspective that it had never been photographed from. I decided to use an elevated view looking down from the right side that would show both the front and the side. As with the others, this involves drawing the floor plan in perspective, then drawing the walls up from there. I used the same method as described in the University College perspective drawing.

From here it was a matter of filling in details and figuring out how shadows fell.


As with the other perspective drawings, I added a border around this one. The centrepiece of the border was a triskelion which is over the arched door on the west façade (seen above, on the tower). Here it is in detail.

Here is the final rendering.

3-point Perspective Rendering
As a challenge to myself I decided to try a 3-point perspective rendering looking up at the building. For this I used a method found in Craig Attebery’s book “The Complete Guide to Perspective Drawing”, which I highly recommend. I started by laying out the geometric scheme for vanishing points and scaling. I drew it at a small scale for reference and scaled each measurement up as I drew the actual image.

The following images show the building taking form, and where I am at with it currently (December 1st, 2023).

